목차
1. 네이버 클라우드 설정 > Key 발급
2. SpringBoot 설정
3. 코드 작성 (HttpURLConnection 사용 / RestTemplate 사용)
1. 네이버 클라우드 설정 > Key 발급
네이버 클라우드에서 제공하는 감정분석 서비스를 사용하기 위해서
https://www.ncloud.com/product/aiService/clovaSentiment
NAVER CLOUD PLATFORM
cloud computing services for corporations, IaaS, PaaS, SaaS, with Global region and Security Technology Certification
www.ncloud.com
해당 사이트에 로그인 후 콘솔을 선택한다.
+ 참고로 Sentiment 서비스는 한국어에 최적화된 감정 분석 기술 서비스로 예시는 다음과 같다.
(월 1000회 이하 무료 / 1회 호출 사용 최대 글자수 1000자)

로그인 후 콘솔 창에 들어왔다면 Services > AI Naver API > AI NAVER API를 선택한다.

다음과 같은 화면이 보인다면 Application 등록 버튼을 클릭 후

Application 이름을 입력하고 CLOVA에서 CLOVA Sentiment를 클릭해준다.

그리고 필요 시 서비스 환경을 등록해준다.
나는 일단 서버 환경에서 로컬로 테스트하기 위해 Web 서비스 URL만 등록해주었다.

서비스 환경까지 등록해주었다면 저장 버튼을 클릭했을 때 Application이 등록되고 인증 정보를 클릭했을 때 ClientID와 Client Secret값을 확인할 수 있다. API 요청을 위한 Key값으로는 ClientID, ClientSecret 값이 필요하므로 잘 저장해두어야 한다! (나중에 다시 볼 수 있다)
2. SpringBoot 설정
나는 Spring Boot 2.7.12 버전에 자바 11 버전을 사용중이며, 네이버 클라우드 Sentiment API를 사용하기 위해 content를 Json 형식으로 보내줘야 하기 때문에 build.gradle에 다음과 같은 의존성을 추가해주어야 한다. (JsonObject를 사용할 예정)
dependencies {
	// Gson 라이브러리로1 Json 파싱
	implementation 'org.jsoup:jsoup:1.14.2'
	implementation 'com.google.code.gson:gson:2.8.7'
}
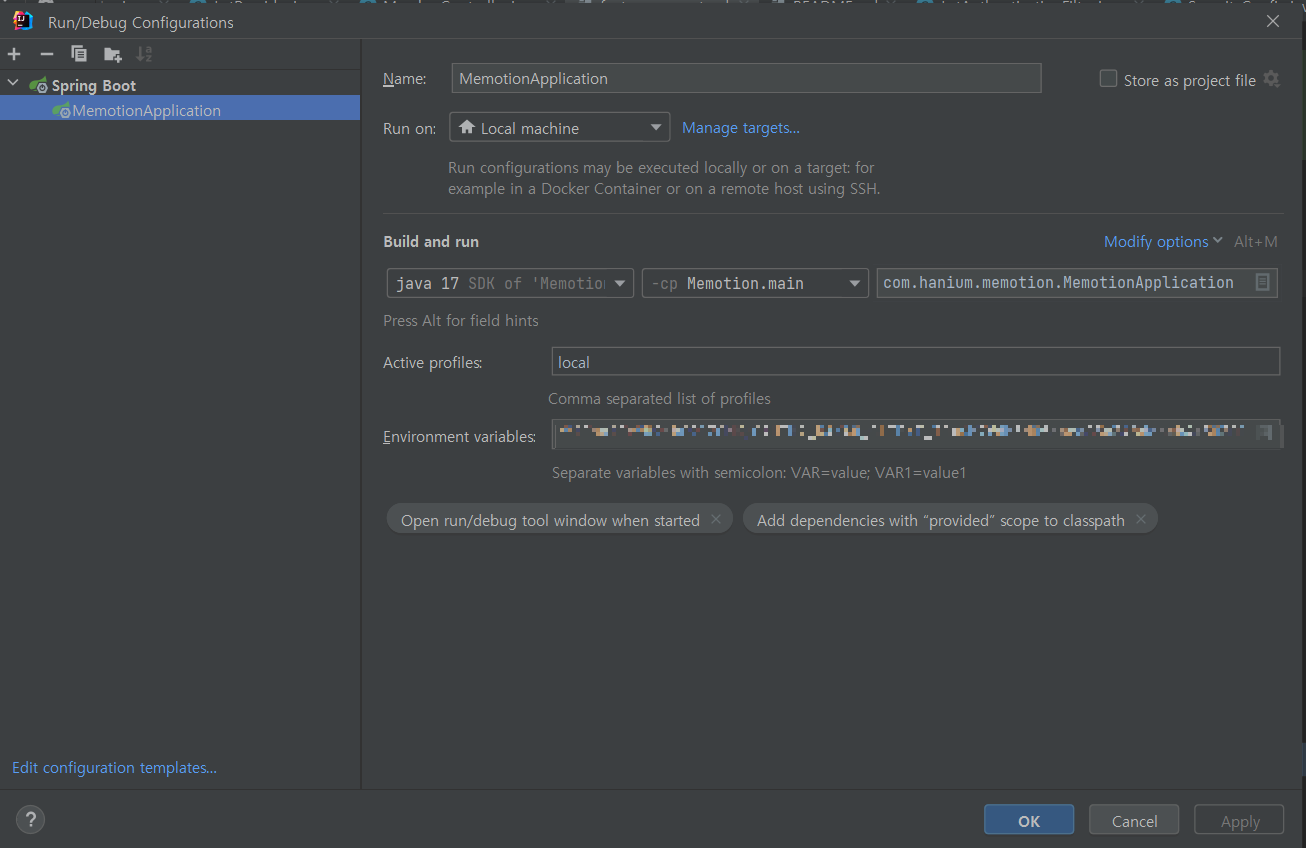
또한 방금 네이버에서 발급받은 Key들을 application.yml에 등록해주어야 한다. 나는 yml 파일을 .gitignore에 추가하지 않았기 때문에 실질적인 Key값은 인텔리제이에 환경변수로 설정해주었고 ${NAVER_CLIENT_ID}, ${NAVER_CLIENT_SECRET}로 값을 주입받았다.
sentiment:
  clientId: ${NAVER_CLIENT_ID}
  clientSecret: ${NAVER_CLIENT_SECRET}
인텔리제이로 환경변수를 등록하려면 Edit Configuration > Environment variables에 NAVER_CLIENT_SECRET=어쩌공;NAVER_CLIENT_SECRET=저쩌공; 요런식으로 작성해주면 된다.

3. 코드 작성
자바에서 외부 API를 호출하는 방법은 여러가지가 있다.
- HttpURLConnection/URLConnection
- RestTemplate
- HttpClient
- WebClient
- OpenFeign
나는 HttpURLConnection과 RestTemplate 두 가지 방식을 사용해서 작성해볼 예정이다.
1️⃣ HttpURLConnection
👍 장점
HttpURLConnection은 자바에서 기본적으로 제공하는 API로 URL을 이용해 외부 API에 연결하고 데이터를 전송할 수 있다. 데이터의 타입/길이에 거의 제한이 없다는 장점이 있다.
👎 단점
오래된 자바 버전에서 사용되기 때문에 동기적으로 통신한다.
따라서 요청을 보내고 응답이 올 때까지 스레드는 대기 상태에 있다.
2️⃣ RestTemplate
👍 장점
스프링에서 3.0에서 추가된 http 통신에 유용한 템플릿이다.
org.springframework.http.client 패키지에 존재하며 HttpClient를 추상화하여 제공한다.
요청 시 Json, Xml, String 과 같은 형식의 응답을 받을 수 있으며 Restful 원칙을 지킨다.
👎 단점
HttpURLConnection과 동일하게 동기적 방식이라는 단점이 있다.
+ RestTemplate이 deprecate (대안기술이 나와, 곧 제거될 예정) 되었다는 이슈가 있다. 그러나 공식문서에서 유지관리모드에 있다는 표현을 사용하고 있고 아직 대부분의 개발자들이 RestTemplate을 많이 사용하는 추세이므로 WebClient나 OpenFeign 같은 방식을 고려하면 좋다는 정도로 해석하면 될 것 같다.
첫 번째로 HttpURLConnection을 활용한 예제이다.
EmotionAnalyzeController.java
@RestController
@RequiredArgsConstructor
public class EmotionAnalyzeController {
    private final EmotionAnalyzeService emotionAnalyzeService;

    // 다이어리 작성 내용을 바탕으로 감정분석 (네이버 감정 분석 -> GPT 분석)
    @PostMapping("/sentiment")
    public BaseResponse<String> sentiment(@RequestBody String content) {
        if(content.isEmpty())
            throw new BaseException(ErrorCode.EMPTY_DIARY);
        String result = emotionAnalyzeService.createSentiment(content);
        return BaseResponse.onSuccess(result);
    }
}
EmotionAnalyzeService.java
@Service
@RequiredArgsConstructor
public class EmotionAnalyzeService {
    @Value("${sentiment.clientId}")
    private String clientId;

    @Value("${sentiment.clientSecret}")
    private String clientSecret;

    // Naver CLOVA Sentiment
    public String createSentiment(String diaryContent) {
        StringBuffer response = new StringBuffer();

        try {
            JsonObject object = new JsonObject();
            object.addProperty("content", diaryContent);

            String apiURL = "https://naveropenapi.apigw.ntruss.com/sentiment-analysis/v1/analyze";
            URL url = new URL(apiURL);
            HttpURLConnection con = (HttpURLConnection) url.openConnection();
            con.setRequestMethod("POST");
            con.setRequestProperty("X-NCP-APIGW-API-KEY-ID", clientId);
            con.setRequestProperty("X-NCP-APIGW-API-KEY", clientSecret);
            con.setRequestProperty("Content-Type", "application/json");

            // post request
            con.setUseCaches(false);
            con.setDoOutput(true);
            con.setDoInput(true);

            try (OutputStream os = con.getOutputStream()){
                byte request_data[] = object.toString().getBytes("utf-8");
                os.write(request_data);
            }

            int responseCode = con.getResponseCode();
            BufferedReader br;
            if (responseCode == 200) { // 정상 호출
                br = new BufferedReader(new InputStreamReader(con.getInputStream()));
            } else { // 오류 발생
                br = new BufferedReader(new InputStreamReader(con.getErrorStream()));
            }

            String inputLine;
            while ((inputLine = br.readLine()) != null) {
                response.append(inputLine);
            }
            br.close();
        } catch (Exception e) {
            e.printStackTrace();
        }

        return response.toString();
    }
}
두 번째로 RestTemplate을 활용한 예제이다. (ResponseEntity도 함께 사용했다!)
EmotionAnalyzeController.java
@RestController
@RequiredArgsConstructor
public class EmotionAnalyzeController {
    private final EmotionAnalyzeService emotionAnalyzeService;

    // Naver Cloud : CLOVA Sentiment API 테스트
    @GetMapping("/sentiment")
    public HashMap<String, Object> getAnalyzeResult(@RequestBody String content) {
        return emotionAnalyzeService.getAnalyzeResult(content);
    }
}
EmotionAnalyzeService.java
@Slf4j
@Service
public class EmotionAnalyzeService {
    @Value("${sentiment.clientId}")
    private String clientId;

    @Value("${sentiment.clientSecret}")
    private String clientSecret;


    public HashMap<String, Object> getAnalyzeResult(String content) {
        String url = "https://naveropenapi.apigw.ntruss.com/sentiment-analysis/v1/analyze";
        HashMap<String, Object> result = new HashMap<String, Object>();

        try {
            RestTemplate restTemplate = new RestTemplate();

            // create headers
            HttpHeaders headers = new HttpHeaders();
            headers.setContentType(MediaType.APPLICATION_JSON);
            headers.add("Content-Type", "application/json");
            headers.add("X-NCP-APIGW-API-KEY-ID", clientId);
            headers.add("X-NCP-APIGW-API-KEY", clientSecret);

            // create param
            JsonObject jsonObject = new JsonObject();
            jsonObject.addProperty("content", content);

            HttpEntity<String> entity = new HttpEntity<String>(jsonObject.toString(), headers);
            ResponseEntity<?> response = restTemplate.exchange(url, HttpMethod.POST, entity, Object.class);

            result.put("statusCode", response.getStatusCodeValue()); // http status code를 확인
            result.put("header", response.getHeaders()); // 헤더 정보 확인
            result.put("body", response.getBody()); // 실제 데이터 정보 확인

            return result;
        } catch (HttpClientErrorException | HttpServerErrorException e) {
            result.put("statusCode", e.getRawStatusCode());
            result.put("body", e.getStatusText());
            log.info("error: " + e.toString());

            return result;
        } catch (Exception e) {
            result.put("statusCode", "999");
            result.put("body", "exception 발생");
            log.info("error: " + e.toString());

            return result;
        }
    }
}
한 눈에 보기에도 RestTemplate을 활용한 예제가 더 Restful 하다는 것을 알 수 있다.
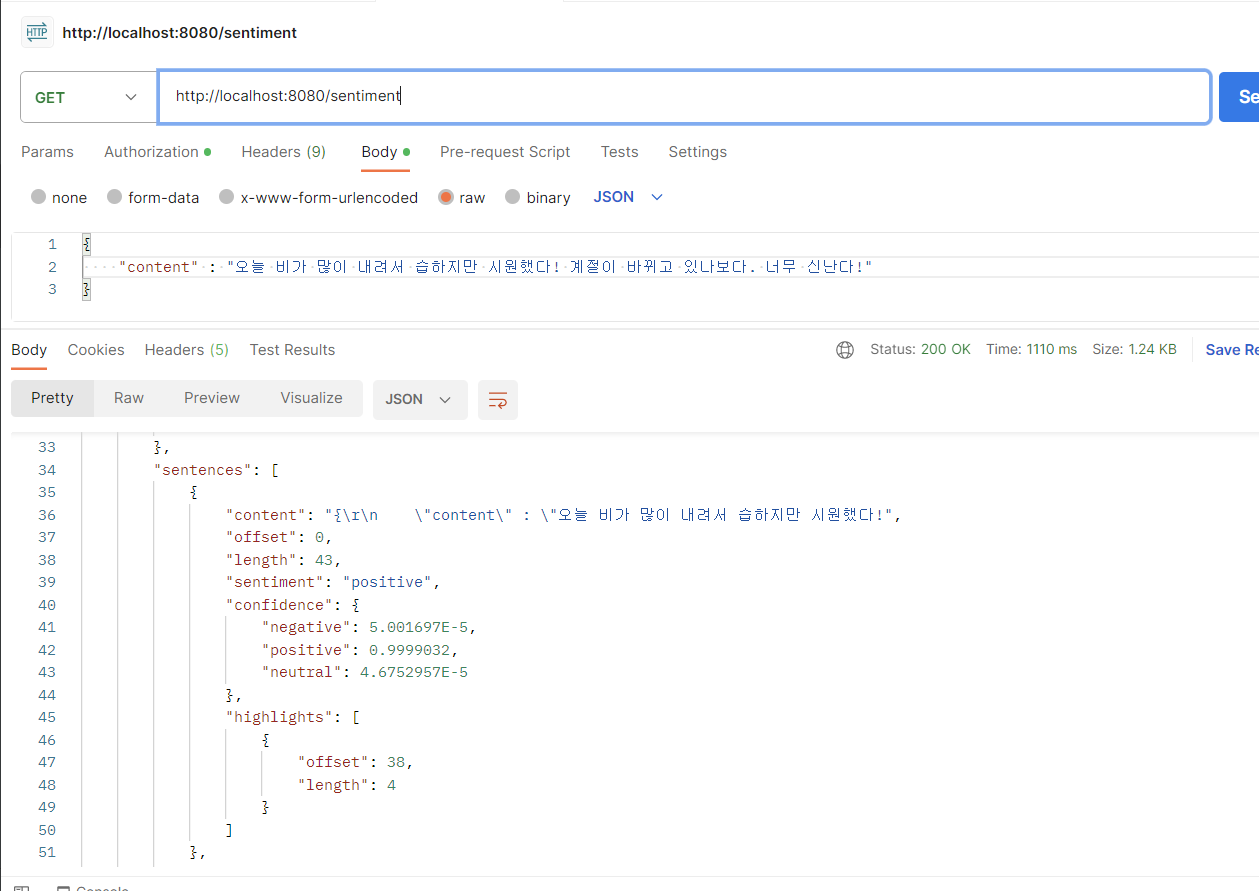
테스트용으로 작성하느라 두 방식이 반환 타입이 일치하진 않지만 RestTemplate 기준으로 결과는 다음과 같다.
네이버 Sentiment API는 한 줄 단위로 문장을 분석해주기 때문에 사진은 잘렸지만 sentences 안에 데이터가 list 형태로 들어있는 것을 확인할 수 있다.

'Framework > Spring' 카테고리의 다른 글
| [AWS] S3 활용한 SpringBoot 파일 업로드 프로젝트 (0) | 2023.12.15 |
|---|---|
| [SpringBoot] Swagger 3.0 + 전역적 Bearer 토큰 적용 (0) | 2023.10.31 |
| [SpringBoot] ChatGPT를 활용한 API 작성 (0) | 2023.08.21 |
| [SpringBoot] JPA ConverterNotFoundException 에러 (0) | 2023.05.16 |
| [SpringBoot] JPA NoViableAltException: unexpected token: value 에러 (0) | 2023.04.02 |
